Imagine settling into your sleeping bag after a long day of hiking, only to find the zipper stubbornly stuck, refusing to close, or worse, completely separated. A malfunctioning sleeping bag zipper can quickly turn a comfortable night under the stars into a shivering ordeal, compromising your warmth, safety, and overall outdoor experience. But don’t let a minor hardware malfunction derail your adventure. Often, a broken sleeping bag zipper can be fixed quickly and effectively with a few simple DIY techniques and common tools. This guide will walk you through identifying the problem, gathering the right supplies, and executing step-by-step repairs to get your sleeping bag back in working order.
Understanding Your Sleeping Bag Zipper: Anatomy and Common Problems
Before diving into repairs, it’s helpful to understand the basic components of a zipper and the common ways they can fail. Zippers, while seemingly simple, are intricate mechanisms designed for durability, but even the best can encounter issues over time. Knowing what to look for will significantly streamline your repair process.
Zipper Anatomy 101
|
Our Picks for the Best Sleeping Bag in 2026
As an Amazon Associate I earn from qualifying purchases.
|
||
| Num | Product | Action |
|---|---|---|
| 1 | MalloMe Sleeping Bags for Adults Cold Weather & Warm - Backpacking Camping Sleeping Bag for Kids 10-12, Girls, Boys - Lightweight Compact Camping Essentials Gear Accessories Hiking Sleep Must Haves |

|
| 2 | BubblePanda Rayon Made from Bamboo Sleep Sack 6-12 Months 1.0 Tog Soft Toddler Sleeping Sack for Babies 2-Way Zipper Baby Wearable Blanket |
|
| 3 | REDCAMP Cotton Flannel Sleeping Bag for Camping Backpacking, Adults Cold Weather Envelope Sleeping Bags with 2/3/4/6lbs Filling |
|
| 4 | Coleman Brazos 20/30°F Adult Cool-Weather Sleeping Bag with No-Snag Zipper & Stuff Sack, Machine Washable, Great for Camping, Traveling, Guests, & More |
|
| 5 | 0 Degree Winter Sleeping Bags for Adults Camping (450GSM) - Temp Range (5F–32F) Portable Waterproof Compression Sack- Camping Sleeping Bags for Big and Tall in Env Hoodie: Backpacking Hiking 4 Season |
|
| 6 | Coleman Brazos 20/30°F Adult Cool-Weather Sleeping Bag with No-Snag Zipper & Stuff Sack, Machine Washable, Great for Camping, Traveling, Guests, & More |
|
| 7 | MalloMe Sleeping Bags for Adults Cold Weather & Warm - Backpacking Camping Sleeping Bag for Kids 10-12, Girls, Boys - Lightweight Compact Camping Essentials Gear Accessories Hiking Sleep Must Haves |
|
| 8 | Coleman Heritage Big & Tall 10°F Flannel Sleeping Bag, XL Sleeping Bag Fits Adults up to 6ft 7in Tall, Machine Washable, Great for Camping, Hunting, Guests, & More |
|
| 9 | oaskys Camping Sleeping Bag - 3 Season Warm & Cool Weather - Summer Spring Fall Lightweight Waterproof for Adults Kids - Camping Gear Equipment, Traveling, and Outdoors |
|
| 10 | Cold Weather Sleeping Bag 100% Cotton Flannel XXL for Adults Big and Tall,Free Compression Sack |
|
A typical sleeping bag zipper consists of several key parts working in unison. The teeth (or coils for coil zippers) interlock to create a seal, running along two strips of fabric tape sewn to your sleeping bag. The slider is the component you pull, which rides along the teeth, engaging or disengaging them. Attached to the slider is the pull tab, which you grasp to operate the zipper. At the ends of the zipper track are stops: a top stop (often a metal clamp) prevents the slider from coming off at the top, and a bottom stop (either metal or reinforced stitching) does the same at the bottom. Understanding these parts helps pinpoint where the problem lies.
Identifying the Break: Common Zipper Issues
Zipper problems can manifest in various ways, each requiring a slightly different approach to repair. The most frequent culprit is often a worn-out or damaged slider that no longer properly joins the zipper teeth, leading to the zipper separating even when seemingly closed. Another common frustration is a zipper that feels stiff, sticky, or entirely jammed, preventing any movement. Sometimes, the pull tab breaks off, making the slider difficult to operate, or fabric from the sleeping bag gets caught and snags the zipper. Less common, but more serious, issues include bent or missing zipper teeth, which can hinder proper interlocking and may require more advanced intervention or professional help. Taking a moment to diagnose the exact nature of your zipper’s malfunction is the critical first step to a successful fix.
Essential Tools and Materials for DIY Zipper Repair
Many common sleeping bag zipper issues can be resolved with a few inexpensive tools and replacement parts. Having these items on hand, whether in your workshop or a compact repair kit for the trail, prepares you for most unexpected zipper emergencies.
Basic Tool Kit
For most zipper repairs, you won’t need an elaborate collection of tools. A good pair of pliers is indispensable; needle-nose pliers are useful for fine adjustments and crimping, while adjustable or hinged pliers can offer a stronger, more even squeeze for tightening sliders. If your zipper has metal top stops that need removal, a pair of end nippers (small wire cutters) will be very helpful. A small screwdriver or awl can assist in gently prying open tight spots or removing fabric. Finally, a sharp pair of scissors is always useful for trimming loose threads or fabric snags. These simple tools form the foundation of any effective DIY zipper repair.
Replacement Parts You Might Need
The most frequently replaced part in a broken zipper scenario is the slider. When purchasing replacements, ensure they match the original’s size (typically #5, #8, or #10 for sleeping bags, often stamped on the back of the old slider) and type (coil or tooth). It’s always wise to buy a couple of extra sliders if your sleeping bag features a double-slider zipper, allowing you to open it from both the top and bottom. You’ll also likely need new zipper stoppers, both top and bottom, to secure the new slider in place. Many outdoor stores and online retailers offer dedicated universal repair kits like the FixnZip, which provide adjustable, tool-free slider replacements for various zipper sizes and types. For sticky zippers, zipper lubricant—such as a specialized wax, silicone spray, or even a bar of soap—can work wonders. Lastly, a sturdy needle and thread are essential for re-stitching fabric stops or securing areas after repair, particularly for closed-loop zippers.
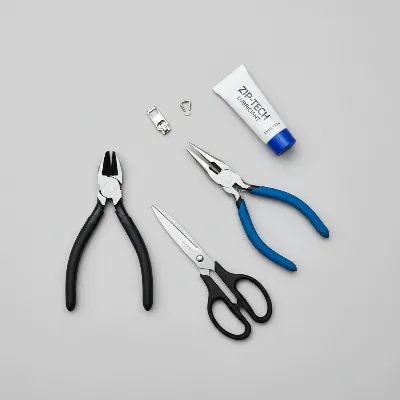 Essential tools and replacement parts for DIY sleeping bag zipper repair laid out on a clean surface.
Quick Fixes for Common Sleeping Bag Zipper Issues
Not every zipper problem requires a full slider replacement. Many common issues can be resolved swiftly with on-the-spot adjustments, saving you time and effort. These quick fixes are particularly valuable when you’re out in the field and need a rapid solution.
Liberating a Jammed Zipper (Fabric Caught)
One of the most frustrating, yet often simplest, zipper problems is when fabric from your sleeping bag gets caught in the slider, jamming it completely. The key here is patience and gentleness. First, avoid forcing the slider, as this can worsen the jam or damage the zipper teeth or fabric. Carefully identify the snagged fabric and gently pull it away from the slider. If the slider is partially stuck due to a bent pull tab, you might gently try to straighten the tab with your pliers, allowing for smoother movement. Sometimes, carefully wiggling the slider back and forth a tiny bit while applying gentle tension to the fabric can help it release. Always prioritize protecting the zipper teeth and the sleeping bag fabric from further damage during this process.
Revitalizing a Stiff or Sticky Zipper
Over time, dirt, dust, and grime can accumulate in the zipper track, causing it to become stiff, sticky, or difficult to move. This is a common issue that often has a very straightforward solution: cleaning and lubrication. Begin by thoroughly cleaning the zipper track. Use a stiff-bristled brush, like an old toothbrush, to dislodge any visible debris from between the teeth or coils. A mild soap and water solution can help clean away stubborn dirt; just ensure the zipper is completely dry afterward. Once clean, apply a specialized zipper lubricant, silicone spray, or even a candle wax to the length of the teeth. This creates a smoother surface for the slider to glide over, significantly improving its function. Work the slider back and forth a few times to distribute the lubricant evenly, and you’ll likely notice a remarkable difference in its ease of movement.
Tightening a Loose Zipper Slider (Temporary Fix)
If your zipper closes but immediately separates behind the slider, or the teeth simply aren’t engaging properly, the slider itself might be the issue. Over time, the opening of the slider can widen due to wear, preventing it from effectively cinching the teeth together. A quick, though often temporary, fix involves carefully crimping the slider to reduce its opening. To do this, move the slider to the bottom of the zipper. Using a pair of pliers (adjustable pliers are often better than needle-nose for even pressure), gently squeeze each side of the slider. The goal is to slightly narrow the gap through which the zipper teeth pass. Test the zipper after each gentle squeeze, gradually increasing pressure until the teeth mesh securely. Exercise extreme caution: over-squeezing can jam the slider completely or cause it to break, turning a minor issue into a major one. While this can get you by in a pinch, consider it a temporary solution until a more permanent slider replacement can be performed.
Step-by-Step Guide: Replacing a Broken Zipper Slider
Replacing a worn-out or broken zipper slider is the most common and effective DIY repair for sleeping bags. This process, while requiring a few specific tools, is quite manageable for most outdoor enthusiasts.
Determining Zipper Type and Size
The success of a slider replacement hinges on choosing the correct new slider. Zippers generally come in two main types: coil zippers, which use continuous plastic coils, and toothed zippers, featuring individual plastic or metal teeth. More importantly, zippers are sized, often indicated by a number (#3, #5, #8, #10) stamped on the back or underside of your existing slider. Sleeping bags commonly use #5 or #8 zippers for durability. It’s crucial to match both the type and size of the old slider with your new one for proper function. Additionally, understand if your sleeping bag has a separating zipper (like a jacket, where both sides fully detach) or a closed-loop zipper (sewn in at one end, common on many sleeping bags and tents). This will dictate how you remove and install the slider.
Removing the Old Slider (Top Stop Method)
For zippers with a metal top stop—the small metal clamp at the top end of the zipper track—this is typically the easiest point of entry. First, move the old slider all the way to the top of the zipper, getting it as close to the top stop as possible. Next, using your end nippers, carefully pinch the metal top stop. Your aim is to crimp it just enough to loosen its grip on the fabric tape, allowing you to pull it away without damaging the surrounding material. Once the top stop is removed, you can simply slide the old, broken slider off the end of the zipper tape. Pay attention to the orientation of the old slider as you remove it; you’ll want to install the new one facing the same way.
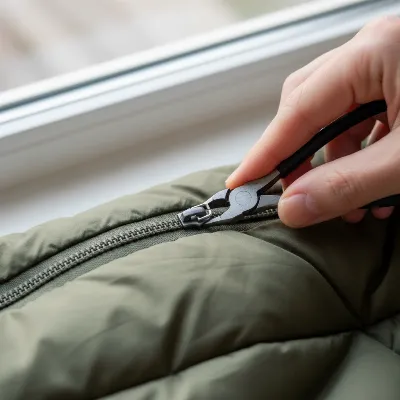 A step-by-step image showing the removal of a sleeping bag zipper's top stop with nippers.
Installing the New Slider
With the old slider removed and your new, correctly sized replacement in hand, installation is the next step. If your sleeping bag has a single slider, simply align the two sides of the zipper tape and carefully thread them through the two openings of the new slider. For double-slider zippers (common on sleeping bags, allowing opening from either end), ensure both sliders are facing the correct direction and are installed on the same side of the zipper. Slide the new slider(s) onto the zipper tape from the top, where you removed the stop. It might take a little patience to get the teeth to feed smoothly into the slider’s channels. Once the slider is on, gently pull it down a short distance to ensure it’s properly engaging the teeth and moving freely.
Attaching a New Zipper Stop
After the new slider is successfully installed, you must replace the top stop to prevent the slider from coming off again. Take a new metal zipper stop and position it at the very top end of the zipper tape, where the original stop was located. Using your needle-nose pliers, carefully crimp the new stop firmly onto the fabric tape. Ensure it’s securely attached and won’t easily pull off, but avoid squeezing so hard that you damage the metal or the fabric. Test the zipper by moving the slider up to the new stop to confirm it halts effectively without popping off.
Special Case: Closed-Loop Zippers (Bottom Stop Method)
For sleeping bags with closed-loop zippers, where the zipper is sewn into the fabric at both ends, the top stop removal method isn’t an option. In this scenario, you’ll need to work from the bottom. Locate the bottom stop, which might be a small metal crimp or simply a reinforced section of stitching. If it’s stitching, carefully use a seam ripper to unpick a few stitches on the fabric tape just below the existing slider, creating an opening. Once the opening is sufficient, slide the old slider off. To install the new slider, thread both sides of the zipper tape into the new slider from the bottom opening you created. After the new slider is in place and tested, you’ll need to create a new bottom stop. This can be done by carefully sewing a new, strong fabric stop by hand with heavy-duty thread, or by re-stitching the original opening with durable stitches, ensuring the slider cannot travel off the end.
Alternative Repair Solutions: Universal Zipper Repair Kits
Beyond traditional slider replacement, innovative products offer convenient and often tool-free alternatives for zipper repair, proving invaluable, especially when you’re on the go.
The Convenience of a FixnZip
One of the most popular and versatile alternative solutions is the FixnZip universal zipper repair kit. This ingenious device is designed to replace a broken slider without requiring any tools or sewing, making it an excellent option for quick field repairs or for those who prefer a less involved process. The FixnZip attaches directly to the zipper teeth and uses a screw-tightening mechanism to adjust its grip, allowing it to work across a range of zipper sizes and types (coil or tooth). Simply unscrew the FixnZip, place it over the zipper teeth where the original slider was, and then tighten the screw until it firmly grips the teeth. Its adjustable nature means you don’t need to precisely match the original slider’s size, significantly simplifying the repair process and providing a quick, durable fix to get your sleeping bag functioning again in minutes.
Other Universal Kits
Many other universal zipper repair kits are available on the market, often providing a selection of different slider sizes and types, along with basic tools like pliers and stoppers. Some kits feature “no-sew” sliders that can be clipped or clamped onto the zipper tape without the need for needle and thread. These kits are fantastic for backpacking or camping trips, offering a compact and lightweight solution for unexpected zipper emergencies. While not always as robust as a perfectly matched, crimped-on replacement, these universal options provide enough functionality to save a trip or postpone a more intricate repair until you return home. They offer peace of mind, knowing you have a backup solution for zipper failure when miles away from civilization.
Preventing Zipper Problems: Maintenance and Best Practices
While knowing how to fix a broken zipper is a valuable skill, preventing issues in the first place is even better. Regular maintenance and careful handling can significantly extend the life of your sleeping bag zipper, ensuring it remains reliable for countless adventures.
Regular Cleaning and Lubrication
Dirt, sand, and debris are the arch-nemeses of any zipper. Grit caught in the teeth can lead to excessive wear on the slider and cause jamming. Make a habit of regularly cleaning your sleeping bag zipper, especially after trips to sandy or dusty environments. Use a small brush to scrub away any visible dirt from the teeth and fabric tape. For a deeper clean, a mild soap and water solution works well, ensuring the zipper is thoroughly dried afterwards. Once clean, apply a specialized zipper lubricant or a simple silicone spray. This helps the slider glide smoothly, reduces friction, and repels dirt and moisture. A little preventative care goes a long way in keeping your zipper running smoothly and quietly.
Proper Zipping Techniques
How you operate your zipper directly impacts its longevity. Always avoid forcing the slider if it encounters resistance. Instead, gently pull back slightly and address the obstruction, whether it’s snagged fabric or a misaligned tooth. When zipping up, try to use a smooth, even motion, and avoid pulling the slider at an awkward angle. If your sleeping bag has an anti-snag strip along the zipper, ensure the fabric is clear before zipping. Forcing a zipper can bend the teeth, deform the slider, or tear the fabric, creating problems that are much harder to fix than a simple jam. Treat your zipper with care, and it will serve you well for years.
Careful Storage
Believe it or not, how you store your sleeping bag can affect its zipper. When packing or storing your sleeping bag, avoid crushing or excessively bending the zipper track. Severe kinks or pressure can warp the zipper teeth or slider, leading to future malfunctions. It’s often recommended to store your sleeping bag with the zipper either fully open or partially open. This relieves tension on the slider and teeth, preventing them from being under constant stress when not in use. Ensure your sleeping bag is clean and completely dry before storing it to prevent mildew and corrosion, which can also degrade zipper performance over time.
When to Seek Professional Repair
While many zipper problems are amenable to DIY solutions, there are instances when professional repair is the wisest course of action. If your sleeping bag zipper has extensive damage, such as multiple broken or missing teeth, significant tears in the zipper tape, or a completely seized slider that cannot be manipulated, a professional can often perform a full zipper replacement. This intricate process involves removing the old zipper entirely and sewing in a brand-new one, ensuring a factory-quality finish and restoring your sleeping bag to its original functionality. Additionally, if you lack the specific tools, replacement parts, or confidence to undertake the repair yourself, or if the sleeping bag is a high-value item, entrusting it to a specialized outdoor gear repair service is a prudent choice. They have the expertise and equipment to handle complex repairs, ensuring your gear is restored correctly and safely for your next adventure.
Conclusion
A broken sleeping bag zipper doesn’t have to signal the end of your beloved gear or the start of a miserable night outdoors. As an experienced technician with a decade in camping gear, I’ve seen countless zipper woes and know that many can be quickly remedied with a hands-on approach. From freeing a simple snag and revitalizing a sticky track with lubrication to replacing a worn-out slider, the power to fix often lies in your own hands. By understanding basic zipper anatomy, having a few essential tools ready, and practicing mindful maintenance, you can tackle most common issues with confidence. Don’t let a minor malfunction spoil your wilderness experience; empower yourself with these DIY repair skills and ensure your sleeping bag is always ready to provide warmth and comfort. What’s your top tip for keeping your camping gear in peak condition for every journey?